
THE QUILTS ARE DONE! THE QUILTS ARE DONE!
See? No elaborate lead-in needed. Just CAPS and BOLD CAPS. YAYAYAYAY!
(Yes, I'm both a gifted seamstress, and a super-professional writer, obvs.)
Wait, what quilts?, you ask?
Well, it's fair that you might have forgotten...or, I don't know, maybe had other things going on that prevented you from being fully devoted to following my attempts to be crafty...but back in April, I committed to making two quilts (for the girls' new "big-girl bedroom") with the goal of finishing them before their little brother arrives. And I pumped! Because I did it! The last time I made a quilt (also known as my second quilt ever) it took me around nine months, so to be able to make two in half that amount of time? Makes me pretty proud.
Oh- and the other part that makes me pretty proud? I super love how they turned out.
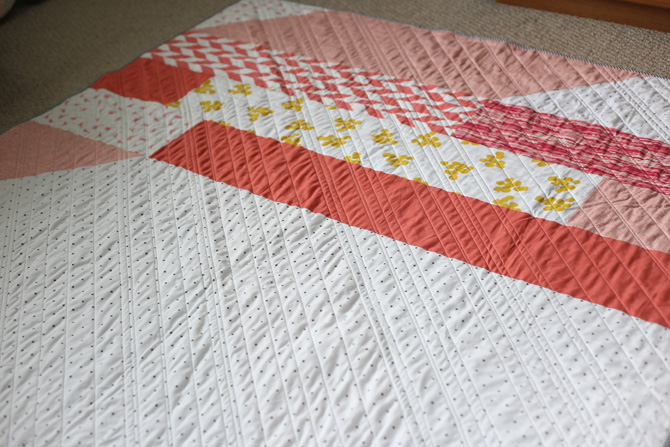
I'll do some more rambling in a minute, but lets just gaze at their beauty for a minute, shall we?
(and yes...I'm going to be this braggy the whole time. Forgive me, but quilts are like little babies you piece together from scratch, and I'm a proud mama showing mine off to the world!)

Aren't they just the cutest little quilt-babies you've ever seen?!

I detailed my planning process, and the beginning stages in an initial post, but after that, I pretty much abandoned documentation in favor of just working it out. I did do a few progress updates on Instagram, but in case you're interested in how a totally non-quilter quilts, here's an outline of my process (with a jillion pics mixed in because pretty):
1. Buy fabric- I did this part first this time around, before even knowing what my quilt layout was going to be. Not smart. It mostly worked out (I only had to go back to the store once to get more) but it made things a lot harder. I had to cobble some things together in order to have enough for certain portions, and in other cases I had a lot of left overs that I didn't need and can't return. It wasn't a disaster by any means, but I definitely see the benefit in getting a plan together first and then getting fabric. Exception- if you're going to do a more free-form or "use up the scraps" type of quilt. Then buy/use whatever you want and see how it turns out. Not sure if I'm enough of a free spirit to give that a go, but it sounds like a fun challenge! (P.s. all of my fabrics were from JoAnn's- with a couple leftovers from my first quilt, and a white/black sheet from Target. The selection at JoAnn's has really improved, and they have a few "designer collections" that are pretty much irresistible. Making a quilt is never going to be cheap but reining in my urge to shop for all kinds of crazy independent/designer/boutique fabrics did help a little. I do recommend splurging on at least one fabric if you have your heart set on it. In the end, quilting is so much work, that it's worth it to make sure you're head-over-heels in love with the finished product.)


2. Design a pattern- I don't know why I insist on doing this myself. I'm sure there are a ton of awesome, modern patterns out there that would save me a ton of work, but for some reason I just like coming up with my own. (FYI- I used -Adobe Illustrator vs. a "real" quilt program). For my next quilt (I say cautiously...) I may try using a stock pattern, or maybe something more traditional "block" based, rather than the large scale piecing I've done on the last few.


3. Plan fabric placement- I mocked up the designs at real size (twin: 69"x 90"), but didn't pay much attention to the sizes of each piece, or how that would correlate to the fabrics I had. So this stage involved entirely too much measuring, geometry, remeasuring, adjusting, cutting, messing up, compensating, and more measuring. I learned a lot about simple things I could do better- like working with fabric widths in mind- but I also tried to just be flexible, and deviate from the plan when the fabric dictated it. Abstract layouts tend to work for me in this regard because you can change the width of a section, or add a piece, or resize an element, and no one is the wiser. There's actually one spot where I completely messed up the size of a triangle, and had to add a strip in order to bridge a gap, and it ended up one of my favorite parts of the entire design.


 5. Sew- Next to choosing fabrics and imaging the design, this might be my favorite part. There was still a good bit of screwing up, seam ripping, and more ironing than I would typically do in a lifetime, but this stage goes pretty fast (especially with big pieces) and it's so gratifying to see it start to take shape.

6. Quilt- As in...put the front/batting/back together as a quilt sandwich and stitch them together. This part I outsourced. The last time I had access to a long-arm, and it was super fun to learn, but for these I found a local woman who quilts as a part-time business who was willing/able to do this part for me. We met and talked about my vision, and landed on a plan (simple variegated diagonal lines). This service isn't cheap, but it's sort of non-optional with quilts at this size, and she did a beautiful job. Side note- I didn't know that I had to leave my batting...or my backer?...I'm still not sure- larger than the finished size of my quilt, so I had them all trimmed before I dropped them off with her. Turns out that means a lot of extra set-up time/work for her, but she was super forgiving and humors my big (Columbus quilters- if you're interested, I'll send you her info...she's awesome!)


7. Bind- I choose to machine bind, because


8. Take a million pictures, and invite everyone you know to come see them- Ok, maybe not an official step...but I'd say it's pretty necessary.
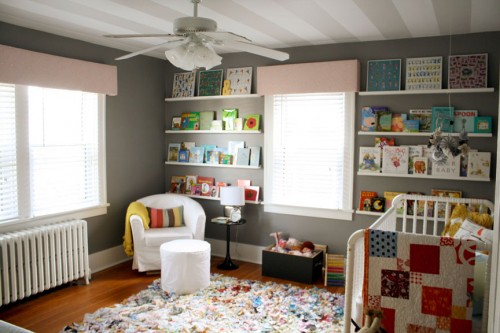
The girls are super excited about their new quilts (which is so fun!) I should have taken pictures of them snuggled up under the finished products...but that actually hasn't happened as much as rolling around on them, dragging them around, jumping on them, and making forts with them. Oh toddlers. Piper's is on her bed now, but since Fin is still in her crib, hers will wait in storage until she's in a bigger bed (lest it suffocate her, or leave her sweltering under 8 layers of folded up quilt jammed to fit atop a tiny mattress). My next step is taking pictures of their big-girl shared bedroom..we've got a couple tiny projects to finish up before that's ready for the big reveal, and if I can make that happen before this baby arrives, it might just be a miracle. Maybe I should quit while I'm ahead?

If you joined in this round of the quilt-along, or thought about it, or wish you had...I'd love to hear from you! What's your favorite part of quilting? Or what intimidates you the most? Any tips for a novice- masquerading-as-an-expert like me? And what should I try next?
-------------------------------------
Psssst....Want to get all the Bowdenisms news delivered right to your inbox?
YES PLEASE! Subscribe via email and never miss an -ism. xox.
YES PLEASE! Subscribe via email and never miss an -ism. xox.


No comments :
Post a Comment